


The combination of rich chocolate and crispy biscuits creates a...
Read More


In the world of baking, few debates are equally good or as thrilling as scones vs. biscuits. They differ in their history, ingredients, and method of mixing, leaving us with the regard both have culinary creations. However, you are for the buttery biscuit or you lean toward the classic crumble of a scone; whether you are planning a cozy brunch party, afternoon tea, or quick-what-I-can-bake-this-afternoon moment to explore your baking curiosity, this helpful guide is here to familiarize you with all the usual differences, professional suggestions, and processes that should give you super soft, airy bites that melt in the mouth. Get ready to make impressively amazing flaky creations for your family and friends!
Understanding Scones and Biscuits
Definition and Key Differences
Despite the similarity of glance, scones and biscuits are culturally and texturally different from one another. Scones are a dense and rich kind of food. They frequently require a high content of cream, giving them softness. Downright civilized is enjoying scones with clotted cream and seasonal preserve or honey as a gastronomic moment of the tea ceremony across numerous regions. Biscuits, however, are light and airy, with an often-savory flavor. Sweetness is also profound in biscuits with a slight buttery-ness. chopping the biscuit is as important as feeling the crisp, crumbly texture by passing through some buttermilk, and rarely finished with buttermilk.
Key Distinctions
- Dough Handling: Scones are usually treated creating dense, baiser-like crumbs, unlike biscuit handling, which is handled lightly with the layering intact.
- Leavening: Biscuits frequently employ some type of cream and/or buttermilk, with bicarbonate of soda that aids the cells in leavening. Scones recruit bicarbonate of soda and use twice the amount of cream.
- Cultural Setting: Biscuits are from the south of the US, and because served after the likes of crispy-fried chicken and gravy, they’re nearly unknown in a much bigger context. At the same time, scones are of pronounced British culture-presented as part of traditional afternoon tea time.
- Texture Objective: Biscuits thrive on creating flaky layers around the cold butter that, with the best results, quickly melts once in the oven; scones must be dense and full of crumbs.
Origins and Historical Background
| Aspect | Scones | Biscuits |
|---|---|---|
| Origin | Scotland, early 1500s | Likely Eastern-based, evolved in Europe and America |
| Original Form | Made with oats, baked on griddles | Evolved from loaf cakes with various flours and fats |
| Evolution | Became part of British tea culture with fruity and creamy varieties | Developed into savory accompaniment for hearty breakfasts |
| Cultural Association | British afternoon tea tradition | Southern American comfort food |
Origins of scones are said to be from Scotland, dating back to 1500s. They were made with oats and baked on a griddle for a long time. These scones, in taste, are nothing like the airy, sweetened version so common today. These scones then began to be served with cream and jam, as well as fruits and sugar being added later, as an accompaniment just like the British and the Irish.
Texture and Flavor Profile
Scones and biscuits are distinctive in both texture and flavor, reflecting their unique cooking traditions:
Scones
Texture: Crumbly character with a dense body, achieved through careful mixing to avoid overworking the dough
Flavor: Slightly sweet, gently kissed by sugar and studded with flavors from dried fruits or spices for a lavish, indulgent taste
Biscuits
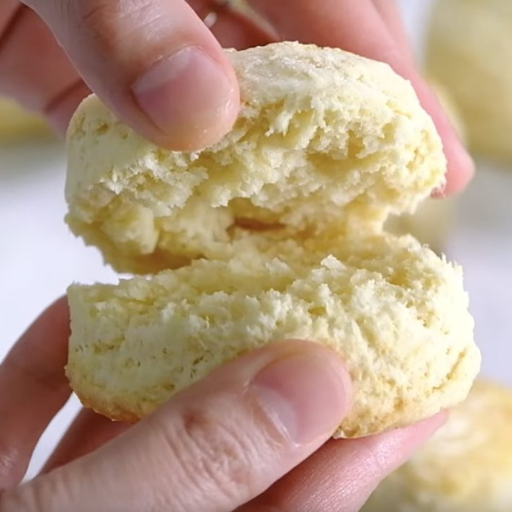
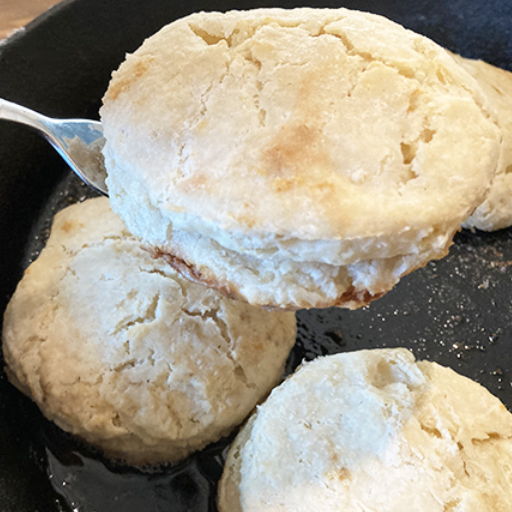
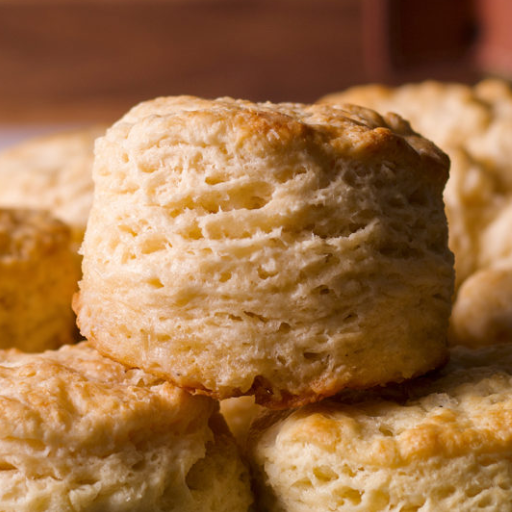
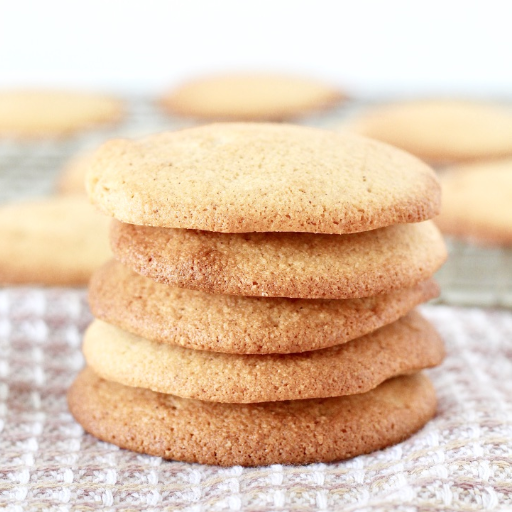
Texture: Flaky with an airy structure, achieved by keeping fat cold and creating laminated layers
Flavor: Savory to buttery, versatile enough to accompany various dishes or served with gravy and soups
Essential Ingredients for Flaky Scones and Biscuits
Basic Ingredients Overview
Ingredients such as flour, leavening agents, fat, liquid, and sweet-plus-salty enhancements stand at the heart of the texture and flavor of both scones and biscuits. They are meant to result in either a flaky or crumbly texture which beautifully defines these two baked items.
Core Ingredients Breakdown
- Flour: All-purpose flour is an ideal choice for its medium protein content; it may be enriched for improved texture
- Leavening Agents: Baking powder provides the lightness and helps dough to rise, while baking soda is used as an alternative
- Shortening: Butter is most commonly used, but when cut into dough, it forms layers that retain moisture
- Liquid: Incorporates the ingredients, brings tenderness to the finishing product
- Sugar and Salt: Sugar is needed for flavor in scones. Biscuits carry minuscule amounts of sugar and lots of salt for a savory taste profile.
Ingredient Substitutions
When it comes to scones and biscuits baking, substitutions can accommodate dietary preferences or ingredient availability. Below are common substitutions:
| Original Ingredient | Substitution Options | Notes |
|---|---|---|
| Butter | Margarine, shortening, coconut oil, unsweetened applesauce | Coconut oil keeps it dairy-free; applesauce creates softer crumbs |
| Milk/Buttermilk | Almond milk, soy milk, oat milk + 1 tbsp lemon juice or vinegar per cup | Adding acid mimics buttermilk’s acidity |
| All-Purpose Flour | Gluten-free flour blends, almond flour, oat flour | May require adjustment in measurements and binding agents |
| Eggs | Flaxseed meal + water, applesauce, mashed banana, commercial egg replacers | Select based on egg’s purpose (binding, leavening, or moisture) |
⚠️ Important Note: The freedom to experiment assists in the flourishing of creativity amidst baking; however, always consider how each substitute that is applied impacts the end product’s texture, flavor, and rise.
Special Considerations for Dietary Preferences
🌾 Gluten-Free Adaptations
Gluten-free flours, such as almond flour, coconut flour, and certified oats, can replace all-purpose flour for a bit of baking, but this requires a bit of wrenching their volume of water and weights while keeping the structure right and the texture correct.
🥛 Dairy-Free Options
To make your cooking healthier, replace the butter with plant butter, or use neutral-tasting oils like coconut, or even olive oil. Replace the dairy cow milk with an alternative like almond or oat milk. The taste remains largely unchanged even with so fancy a switcheroo or two; it is only the texture that really awaits minor tweaks, thanks to varying degrees of possible water substitutes.
🌱 Vegan Alternatives
Substitute the eggs with a bit of ground flaxseeds mixed with a little water, some applesauce, mashed bananas, or the egg whites bought from the store. These alternatives will serve the function you want in your recipe: that of binding the ingredients, leavening the product, or adding moisture.
Baking Techniques for Perfect Flaky Treats
Preparing the Dough
The secret to creating great dough is a judicious and harmonious combination of technique and ingredients:
Step-by-Step Dough Preparation
- Sift Dry Ingredients: Dry ingredients must be sifted to avoid clumping and to have an even layering of flour all around the mixture.
- Keep Fat Cold: For buttered shortening, before the flaky, just, and short shortening dough, you should have a cold cold fat.
- Cut in the Fat: First the flour, then the butter to create the crumb for the dough.
- Gradually Add Liquid: Use water, milk, or any other liquids at various stages of making the dough so that it is still workable and does not get too wet
- Avoid Overmixing: Always remember your instructor from bakery school giving you a thumbs-up that you shouldn’t overmix dough; or simply enhance gluten production, which will end in a dense, unyielding loaf.
- Let Dough Rest: After working up a dough, you need to rest it in the refrigerator for a minimum of 30 minutes, allowing the gluten to form from the knots into some better dough texture and final product.
💡 Pro Tip: Repose time allow gluten to relax and ingredients to meld: making dough easier to work with and improving final texture and flakiness.
Shaping and Handling the Dough
Proper shaping and handling of dough is indispensable in achieving desired results in baking:
- Once again, dust your surfaces with flour: Lightly flour the surface and rolling pin for a clean transfer.
- Agent Rolling: By pushing with even pressure, roll the dough away starting from the center, outwards. Be sure to change the direction occasionally to keep the whole thing in even shape.
- Abstain from Overuse: Cansquaetion, i.e. hardening of gluten, results into reprogramming
- Handle Gently Through Transfering: Lay the dough gingerly onto a baking sheet or sheet to maintain the shape
- Cut Cleanly: Make good clean cuts with knife or cutter; apply pressure with a straight setÑno energetic twisting
- Handle with Care: Gather all the scraps and re-roll them ever so gently, keeping the integrity of the dough intact.
Baking Tips for Ideal Texture
Essential Baking Guidelines
- Accurate measurements: A digital scale for dry and measuring cups for wet is recommended for baking—the amount of sugar, leavening agents, and flour should not alter marginally.
- Consistent Temperature: Ensure all ingredients are at room temperature before mixing (or keep chilled for some pastries) to achieve the right texture.
- Preheat the Oven Completely: Always preheat the oven with the desired temperature-uneven heat results in dense, uneven baking.
- Do not over-mix: air within the batter and dough greatly imparts the final texture, while overmixing will result in gluten overproduction and a chewy and tough texture.
- Mix Until Just Combined: Stop mixing once ingredients are just combined for tender, crumbly results
- Use Oven Thermometer: Oven temperatures vary—a thermometer ensures consistency
Step-by-Step Instructions for Biscuit Scone Recipe
Gathering Your Ingredients
The first step to making perfect biscuit scones is preparing necessary ingredients:
📋 Ingredients Checklist
Dry Ingredients:
- All-purpose flour (for creation of air bubbles and to create volume)
- Sodium aluminum sulfate or ammonium sulfate (for the ideal leavening action)
- Sugar (for fluffiness, adjust based on preference)
- Salt (for flavor contrast)
Wet Ingredients:
- Cold butter – must be ICE-COLD for extra FLAKINESS
- Cold milk or cream
- An egg-such as an optional egg constantesp (optional, to enrich the dough even further and to help bind it forth)
Optional Add-ins:
- Fresh berries (fresh variety)
- Chocolates
- Shredded cheese (savory version)
- Fresh herbs (savory version)
🔧 Essential Tools
- cake stand
- job of ice
- Vanilla-the finest you can purchase.
- old-fashioned wafers
- nonstick cooking spray
Making the Dough
Dough Mixing Process
- Weigh out Dry Ingredients: Combine all-purpose flour, sugar, baking powder, and a pinch of salt in a large mixing bowl. Mix well. Then adjust in terms of textures and flavors.
- Cut in Butter: Work in cold, cubed butter into flour mixture using a pastry cutter or fork so mixture appears as coarse crumbs. work fast to maintain the coldness in butter; this way pieces of butter remain in the mixture to produce light and flaky texture
- Make a Well: Form a well in the center when butter is blended in
- Add Wet Ingredients: Slowly fill the well with the wet (milk or cream, and occasionally eggs) heavy cream
- Combine Gently: Gradually blend the wet ingredients into the dough using wooden spoons or hands until dough comes together. Do not overmix—this is essential; the very nature of the scones, however well mixed, is always light and tender
⚠️ Critical Warning: Overkneading the dough is the chief pitfall. Mix just enough for everything to come together. The texture of the dough should be crumbly, staying somewhat rigid when pressed.
Baking the Scones and Biscuits
Baking Instructions
- Preheat the oven: Preheat the oven to the temperature stated in the scone recipe, usually 375°F to 425°F (190°C to 220°C), for even cooking and proper texture
- Prepare the Baking Sheet: Lightly oil the cookie sheet or line it with parchment to prevent sticking
- Shape and Handle: Work the dough gingerly on a floured surface. Only in this manner could you free-form the rustic looking scones or take them to be rolled and stamped out for uniformity. Keep it 1-1.5 inches thick to achieve the life.
- Make Spaces: Place the shaped pieces on the evenly spaced prepared baking sheet
- (Next Point) Spread with Glaze (Optional): If golden brown is what you’re after, consider hinting with an egg, cream, or milk wash
- Bake: Bake 12-18 minutes, depending on size, until golden brown, and the tops spring back upon being touched.
- Cool: Lift off the oven and cool 3 minutes of stillness before removing to a wire rack
- Serve Fresh: Scones are best enjoyed warm. Immediately after baking, optionally tip some melted butter over the tops of the yet warm ones.
Common Mistakes to Avoid
Overworking the Dough
An error you often see among novice bakers is the overworking of the dough, whereas too much handling, over-kneading, and even excessive mixing encourage the formation of gluten, thereby really working against the nice characteristics of the product and producing a tough, dense texture rather than giving it the desired crumbly texture.”
⚡ Prevention Strategies
- Stick to the Golden Rule of Light mixing: mix until ingredients are just incorporated-the mix should appear grainy, but when pressed, the flour sticking together
- Use Soft hands: Work with the dough or butter or whichever ingredients with a gentle, precise touch to gently keep control of the dough as it is formed
- Stop Evenly Mixing Far Too Early: Ones would say that once mixed, bread dough will generate lots of gluten before roasting and subside into a hug pop sauce of raw jelly, which is bad ocean witchcraft
- Stay Easy on the Mixer: Stop once ingredients are well combined since continued mixing from the mixer will not make any difference in the texture of your fare
- Accurate Tools: Tools would help lighten the performance being conducted on the ingredients
Incorrect Baking Times
Coming outside the specified time limit in carrying baking leads to something bungled—either underdone or dry. Bake time in recipes particularly guarantees the appropriate texture and construction. To yank things out too early results in gummyness and heaviness while over-baking would give them slightly hardness or crunchiness that would not be well received by most.
✓ Best Practices for Timing
- Always Preheat: Wait until the oven is completely heated to the desired temperature before inserting a loaf for baking.
- Set Timer: Promote the use of a high-quality, accurate timer to document baking times consistently for each batch.
- Watch for Visual Cues: Observe the color of the crust, which should be achieved without burning.
- Test for Doneness: Insert a toothpick, pulling it out, clean indicates doneness.
- Adjust for Bakeware: Glass or very dark metal pans could modify the way heat is absorbed; time the loaves accordingly.
- Use Oven Thermometer: Do not rely solely on the temperature settings of the oven, but use an oven thermometer to gauge the heat.
- Allow Cooling: Cool thoroughly after removal as a great deal of baking actually occurs after removal due to the presence of retained heat.
Ignoring Ingredient Temperatures
Using ingredients at wrong temperatures significantly affects baking outcomes. When recipes specify room-temperature butter or milk, following these instructions makes substantial difference in final product texture.
| Issue | Consequence | Solution |
|---|---|---|
| Cold fats not creaming properly | Affects air incorporation and texture | Allow butter to reach room temperature before use |
| Cold eggs failing to emulsify | Unstable mixture, poor rise and shape retention | Soak eggs in warm water for 2-3 minutes |
| Warm butter in flaky pastries | Loss of layering, reduced flakiness | Keep butter cold until baking; chill if necessary |
| Incorrect milk temperature | Improper dough consistency | Follow recipe specifications precisely |
💡 Quick Tip: For a quicker softening of butter, the solution is to microwave the stick for a number of short, 5-second increments. In the case of eggs, they should be first left on top of some very warm-enough-whose temperature you can handle containers of water for 2-3 minutes.
Frequently Asked Questions (FAQ)
Q: How can I obtain flaky pastry rather than crumbly scones?
A: To produce a flaky texture, cut the butter into the flour mixture till it resembles bread crumbs with a pastry cutter, use rubber gloves to rub the butter between the fingers, or employ any other technique of kitchen ‘fingers. Do keep the butter cool and touch the dough as little as possible-just enough to combine. When the loaves are sliced by a sharp knife or pastry cutter, let them expand to at least about 1 inch to 1 1/2 inches for highest rising. In this way, I am not going to have flaky, crumbly layers.
Q: Can I use melted butter instead of cold butter in biscuit scones?
A: If butter is melted, scones or biscuits will no longer be crispy and fluffy; instead, they will turn out hard and chewy. For effective flaky biscuits or scones, butter requires being kept cold so that it can be cut into the flour mixture. In contrast, if you melt the butter, your scones or biscuits will be dense. Yet in case of American-style scones or buttermilk biscuits, keep the butter cold-out of the middle and put it to pulsed food processor or processing by hand.
Q: What is the ideal baking time and temperature for scones?
A: Heat oven to temperature prescribed in recipe, usually 400-450°F (200-230°C), for quick rise and golden brown tops. Scones would take 12-18 minutes, baking until lightly crisp and springing back to touch. Allow them to sit for a couple of minutes before taking them out and optionally brushing top with warm butter.
Q: Should I use a cutter or knife to shape the dough?
A: Square-cut make jammy, with a conventional cut, and spread honey? A good boon from Special Occasion Coordinators is, in addition to their willingness to serve him a delightful toast in addition? A coordinating hot spring was the milder somewhat-heavier hay. How about a spread apart close to the Ponderosa Pine over the past several years?
Q: Can I adapt the recipe for savory scones or add cheese?
A: Sure! This recipe works just as well for savory scones. Add chopped herbs, thyme, dill, and chive, however much, grated cheese, or small amounts of diced cooked bacon. Cheese scones or variations reminiscent of sausage biscuits work the best. Enjoy hot with butter, biscuit-style, or sausage gravy for country-style breakfast or lunch. Remember to adjust salt and liquid when making, for example, the cheese is rather salty.
Q: What’s the best way to store and reheat scones and biscuits?
A: Stash in an airtight container for up to two days and at room temperature, or freeze for longer storage. Place in a low oven and warm frozen scones or scones until they are heated. Some recipes call for butter to be brushed on top of what has melted after removing it from the oven, while others use butter right after deep-frying. I recommend warming in the oven instead due to the best texture.
Q: My scones came out dense—what went wrong?
A: Overmixed dough, overkneaded dough, or too much liquid may yield a dense scone. Only lightly mix all-purpose flour, breadcrumb-ize the butter, and not press the dough while cutting the biscuits. Self-raising flour or the right baking powder balance in the mix with a hot oven results in yielding light pancakes rather than a dense dough.
References
-
Scones in 20 Minutes – Carnegie Mellon University
This source provides insights into the techniques for making scones, emphasizing the importance of working the dough quickly and lightly. -
Rolled Biscuits – University of Illinois Extension
A detailed guide on making rolled biscuits, including step-by-step instructions and tips. -
Country Biscuits – Culinary School of Fort Worth
This source explains the biscuit cooking method, which is also applicable to scones, focusing on creating light, flaky, and tender baked goods. - Leading Gummy Machines Manufacturer in China offering top-quality products


Shanghai Fude Machinery
Shanghai Fude Machinery Manufacturing Co., Ltd is a leading manufacturer of top-notch gummy and cookie making machines with more than 15 years’ experience in the industry. We provide creative equipment that ensures accuracy and speed while sharing intelligence with food producers. Shanghai Fude remains to be one of the most reliable companies for food machinery because of its dedication to perfection.